The Offset Line command is a powerful method of creating lines based upon numeric distances from a reference line. It’s the ideal tool for creating data lines such as the bottom of curb or back of sidewalk.
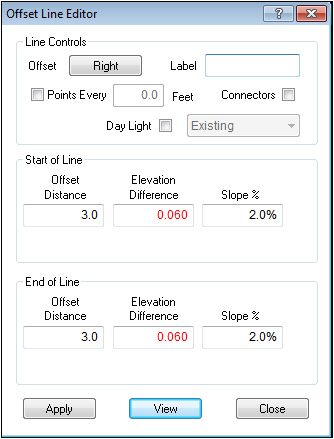
The Offset Line Editor
Select the Offset Line Button ![]() on the menu bar, choose Offset Line from the Utility menu, or type Ctrl-O to display the Offset Line Editor. Toggling the 3D Terrain on displays the results of the offset line while in the Offset Window. Listed below is an explanation of the Offset features.
on the menu bar, choose Offset Line from the Utility menu, or type Ctrl-O to display the Offset Line Editor. Toggling the 3D Terrain on displays the results of the offset line while in the Offset Window. Listed below is an explanation of the Offset features.

Line Controls
|
Offset |
The Offset button toggles the direction of the offset line compared to the selected reference line. The point order on the line determines Right and Left and an arrow displays on the overlay showing the offset direction.
|
|
Label |
This textbox allow you to add a line label to the offset line.
|
|
Points Every |
This is a two part control. When the Points Every checkbox is selected, the program creates extra points on the offset line at the distance specified in the text box. When the checkbox is off, the program matches the points on the reference line and only adds points to correctly model corners.
|
|
Connectors |
This option creates lines between the reference point and its corresponding offset point.
|
|
Daylight |
The Daylight checkbox allows creation of lines at a specified slope to daylight. Checking this option adds Cut and Fill slope text boxes to the Start and End of lines areas. When Daylight is checked, you may change the Daylight surface.
|
Start-End of Line
The Start and End of Line text boxes control the placement of the offset line. Specifying any two values for the Start or End calculates the other value and displays it in red. Varying the Start and End values allows creation of offset lines not parallel to the reference line.
|
Offset Distance |
The distance from the reference line to the offset line.
|
|
Elevation Difference |
The change in elevation between the reference and offset lines.
|
|
Slope |
The slope from the reference line to the offset line specified as a percentage.
|
Confirmation Controls
|
Apply |
Creates an offset line based upon the specifications in the Offset Editor.
|
|
View |
Displays changes made in the Offset Editor settings without actually creating the line.
|
|
Close |
Closes the Offset Editor.
|
Set the values for distance, elevation and slope. Press the View button to see the lines application in real-time. The terrain must be on to see the changes. Press the Apply button to create the line. Press the Close button to exit this window. Pressing Close before the line is applied is the same as cancelling the command. When creating future offset lines, the Offset editor remembers the last settings used and fills in the previous values. Change them as needed.
Offset Line has the ability to offset more than one line at a time. Select all lines to offset using the Left mouse button and the Shift key. Use the Swap Ends command to ensure that all the lines are heading in the same direction.
Also see: Swap Ends