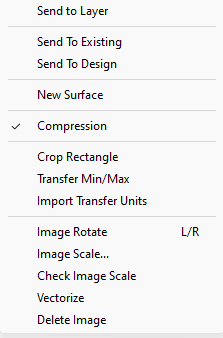
The Data Transfer Menu is used to transfer data from a Vector PDF or CAD file to a Gradework job file. Data can be sent to either the Existing or Design surface and further segregated by sending the data to a specific layer within each surface. When an option is selected, a checkmark appears next to the option. Below are descriptions of the commands located under the Data Transfer Menu.

Send to Layer |
Sends selected data to selected surface and layer displayed in the menu bar. |
Send To Existing |
Sends selected data to the Existing surface and Layer displayed in the menu bar. |
Send To Design |
Sends selected data to the Design surface and Layer displayed in the menu bar. |
|
|
New Surface |
This option will create a new surface. The surface may be used for drone topo data or phased earthwork.
Enter a Name and Color. Click OK. |
Compression |
This option will compress the data removing extra points and detail. |
|
|
Crop Rectangle |
Stretches a window around data to keep and deletes all the data outside the window from all layers of the CAD file. The CAD file is not modified unless you overwrite it using the Export CAD command and name it the same file name. Also see: Cropping Data |
Transfer Min/Max |
This option allows the user to set the minimum and maximum elevations that are transferred. When selected, the following window displays.
Make any changes in the Minimum and Maximum text boxes. The Disable checkbox allows you to turn off the elevation threshold settings. Press OK to apply and close the window. |
Import Transfer Units Video Link: Import Transfer Units
|
The Import Transfer Units window displays when opening a CAD file to begin a new job or by selecting the command from the Data Transfer Menu. There are five unit options available: Feet, International Feet, Meters, Architectural Units, or User Defined. When the command is selected, the following window displays.
Select the unit by clicking one the type of units. If you select User Defined, an additional text box displays.
Choose Feet, International Feet or Meters and type in a value in the Units per Foot/Meter box. Press OK to accept the values and close the window, or press Cancel to discard the changes.
|
Crop Rectangle |
Stretches a window around data to keep and deletes all the data outside the window from all layers of the CAD file. The CAD file is not modified unless you overwrite it using the Export CAD command and name it the same file name. Also see: Cropping Data |
|
|
Image Rotate (L/R) |
Rotates background images clockwise 90 degrees. Press the L key to rotate the image counter-clockwise in 45 degree increments. Press the R key to rotate the iimage clockwise in 45 degree increments. |
Image Scale |
Used to set the scale of the background image. |
Check Image Scale |
Used to check the scale of the background image. |
Vectorize |
Used to generate vector data from a vector PDF file. |
Delete Image |
Used to delete the background image from the file. |
Also see: Right Mouse Menu